
A survey conducted by Microsoft has determined that, out of the totality of the global workforce, there are about 2 billion firstline workers; these people are involved in the daily operations of the company and must be the founding element on which to base the digital transformation of each company.
Unfortunately, according to the survey conducted by the Redmond giant, only 20% of firstline workers are involved in digital transformation processes and this could have a strong impact on the business of companies; in this regard, it is necessary to provide these workers with all the tools necessary to work in the best way and thus make production processes more flexible.
In this article we will deal with the various methods of shared device management put in place by the 3 most important technology companies: Microsoft, Google and Apple.
Benefits and use cases
The ability to work with artificial intelligence (AI) systems and automation tools is the key to developing a modern and successful workforce.
Through the adoption of shared devices, it is possible to equip the workers on the front line with a PC or a mobile device, providing a managed multi-user experience and, at the same time, maintaining the security of the company information.
The benefits that the use of shared devices can bring to the company are many, we report below some of these:
- Communication efficiency: through integration with Azure AD, it is possible to allow each worker to access Microsoft Teams with their company credentials; with the use of this platform, it is possible to communicate quickly and easily.
- Centralized device protection and management: with Microsoft Endpoint Manager, it is possible to centrally manage shared devices and protect the information they contain.
- Increase mobility: through the adoption of shared devices, front line workers are able to access company applications and information wherever they are, managing to manage multiple shifts at the same time.
Microsoft Shared PC
Starting with Windows 10 version 1607, Microsoft introduced a new feature called Shared PC; through this feature, it is possible to provide firstline workers with a shared Windows 10 device where they can easily access corporate resources.
Below are the steps necessary to provision Windows 10 systems in Shared mode.
Autopilot Deployment Profile creation
To manage your devices through the Shared PC methodology, first of all, you need to create a new deployment profile relating to Autopilot in Self-deploying mode (this feature requires the presence of TPM 2.0):
- Log in to the Microsoft Endpoint Manager console with administrative credentials;
- Select Devices – Windows – Windows Enrollment – Deployment Profile;
- Press the Create button and select the Windows PC option from the drop-down menu;
- Enter the name of the registration profile and any description;
- Set the slider to Yes for the Convert all targeted devices to Autopilot option;
- Proceed with the wizard through the Next button;
- Select the Self-Deploying (preview) deployment mode;
- Set, if necessary, the OS language, the automatic keyboard configuration and the application of a template for the name to be assigned to the device;
- Proceed with the wizard through the Next button;
- Conclude the process of creating the deployment profile by assigning it to an Azure AD group;
NOTE: it is assumed that the devices are already registered on the Windows Autopilot service.
Configuration Profile creation
At the end of the deployment profile creation, it is necessary to proceed with the creation of a new Configuration Profile to define how the devices are registered on the Microsoft Endpoint Manager portal.
- Select Devices – Windows – Configuration Profile;
- Press the Create profile button;
- Select the Windows 10 and later option from the Platform drop-down list and from the Profile Type menu select Templates and then Shared multi-user device;
- Press the Create button to start the profile creation procedure;
- Enter the name of the configuration profile and any description;
- Set the slider to Enable for the Shared PC mode option;
- Select the Guest option from the Guest account drop-down list;
- Then, from the Account management menu, select the Enable option and configure the following options as follows:
- Account Deletion: At storage space threshold
- Start delete threshold(%): 10
- Stop delete threshold(%): 20
- If you want to inhibit access to local resources, set the Local Storage option to Disabled;
- Proceed with the configuration of the remaining fields on the basis of your needs;
- Proceed with the wizard through the Next button;
- Conclude the process of creating the Configuration Profile by assigning it to an Azure AD group;
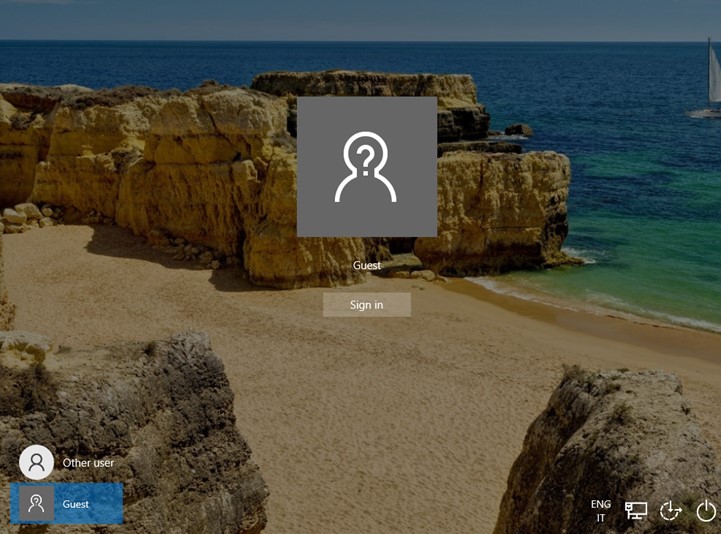
Once this process is completed, it will be possible to register Windows 10 devices in Shared mode providing the following user-experience to its users:

Android Enterprise dedicated devices with AAD shared mode
Android Enterprise dedicated devices with AAD shared mode allows you to configure your Android devices in shared mode with the ability to authenticate with Azure AD credentials thus providing a personalized user experience. In order to proceed with the registration of your Android devices in this mode, you must have the following prerequisites:
- Android 6.0 or later;
- The devices will have to run an Android distribution that includes Google Mobile Services (GMS) and the ability to connect to them;
- Set the MDM authority to Microsoft Intune (see details);
- Managed Google Play account configuration on Microsoft Intune (see details);
To allow you to distribute your devices in Dedicated mode, you need to create a registration profile; this profile will provide a registration token (string) or a QR code that must be used to allow the registration of devices in this mode.
Below you can find the steps to create a new Enrollment Profile:
- Log in to the Microsoft Endpoint Manager console with administrative credentials;
- Select Devices – Android – Android Enrollment – Corporate-owned dedicated devices;
- Click on the Create Profile button;
- Enter the name of the registration profile and any description;
- Set the registration token expiration (it is not possible to set an expiration beyond 90 days from the creation date);
- Continue with the creation wizard through the Next button and confirm the creation through the Create button.
To better manage the distribution of configurations/applications on the subset of devices registered with the profile, it is necessary to proceed with the creation of a dynamic group on the Azure AD side; in the configurations of the Azure AD group it will only be necessary to set the following parameters within the membership rule:
- Property: enrollmentProfileName
- Operator: Equals
- Value: <enrollment_profile_name>
On the devices it will also be possible to add public or private applications or web applications through the Managed Google Play Store; these apps will then be installed automatically once the device has been registered. One of the applications that must be distributed in Required mode is Microsoft Managed Home Screen; For more details on how to add apps through the Managed Google Play Store, refer to the following link.
At this point, you can proceed with the creation of the configuration policy that will prepare the devices in the Dedicated management mode:
- Log in to the Microsoft Endpoint Manager console with administrative credentials;
- Select Devices – Configuration Profiles – Create profile;
- From the Platform drop-down list select the Android Enterprise item;
- From the Profile drop-down list, in the Fully Managed, Dedicated, and Corporate-Owned Work Profile section, select the Device restrictions item;
- Continue with the creation of the profile through the Create button;
- Enter the name and any description of the configuration profile;
- Press the Next button;
- In the Device experience section, from the Enrollment profile type drop-down list, select the Dedicated device item;
- Then select the Multi-app item from the Kiosk mode menu;

- Set the slider to Enable for the Custom app layout option;
- Set the size of the grid that will be set as the home screen;
- Using the various add buttons, based on the position you want to assign, select the various applications to be viewed by users;

- Once the applications have been defined, it will also be possible to configure some device-side settings based on your needs, such as:
- Screen orientation;
- Ability to exit kiosk mode by using a PIN;
- Setting a default wallpaper;
- Setting the Wi-Fi connections to which it is possible to connect;
- Press the Next button;
- Press on the item Select groups to include and select the dynamic group previously created;
- Press the Next button again;
- Check the configured settings in the summary screen and press the Create button to confirm the creation of the new policy;
At this point, it is possible to proceed with the registration of the device through one of the methods indicated in the References paragraph below.

Shared iPad
Also the Cupertino giant has made available a shared device management functionality; the Shared iPad functionality, available starting from version 13.4, allows multiple users to connect to the same device using a Managed Apple ID or a guest user. In order to proceed with the registration of your Android devices in this mode, you must have the following prerequisites:
Hardware requirements:
- iPad Pro, iPad (5th generation or later), iPad Air 2 (or later editions), iPad mini (4th generation or later);
- iPadOS 13.4 or later;
- At least 32GB of space;
Infrastructure requirements:
- Configuring an Apple Device Enrollment token on the Intune side (for more details, see the link);
- Active Federation on Apple Business Manager (for more details, see link);
- Automatic provisioning of Azure AD users on Apple Business Manager (for more details, see link);
The configuration of Apple devices in this mode, as for Android devices, is obtained by setting up a new registration profile; we report below the necessary steps:
- Log in to the Microsoft Endpoint Manager console with administrative credentials;
- Select Devices – iOS/iPadOS – iOS/iPadOS Enrollment – Enrollment program tokens;
- Select the registered Enrollment token;
- Within the Profiles section, press the Create profile button and select the iOS/iPadOS option from the drop-down list;
- Enter the profile name and any description;
- In the Management Settings section, from the User Affinity drop-down list, select the item Enroll without User Affinity;
- Configure the following options as follows:
- Supervised: Yes
- Locked enrollment: Yes
- Shared iPad: Yes
- Once the shared registration methodology has been defined, it will also be possible to configure some device-side settings based on your needs, such as:
- Maximum number of users who can use Shared iPad;
- Maximum amount of time beyond which PIN entry will be requested;
- Maximum amount of time of inactivity beyond which the session will be logged off;
- Ability to access with Guest users only;

- Within the Setup Assistant section, you can define the department, the telephone contact and the configuration windows that can be viewed by users during the registration procedure;
- Continue with the creation wizard through the Next button and confirm the creation through the Create button;
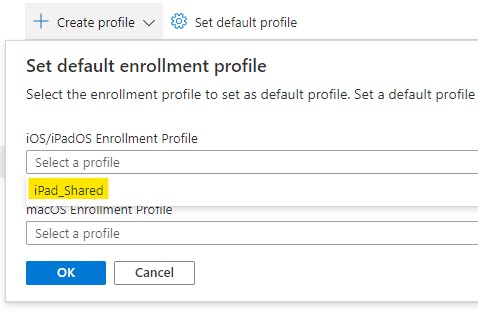
It is also possible to set this profile as the default profile to be applied to new iPad devices; to do this, press the Set default profile button (Devices > iOS/iPadOS > iOS/iPadOS enrollment > Enrollment program tokens > Token > Profiles) and from the drop-down list iOS/iPadOS Enrollment Profile select the affected profile.
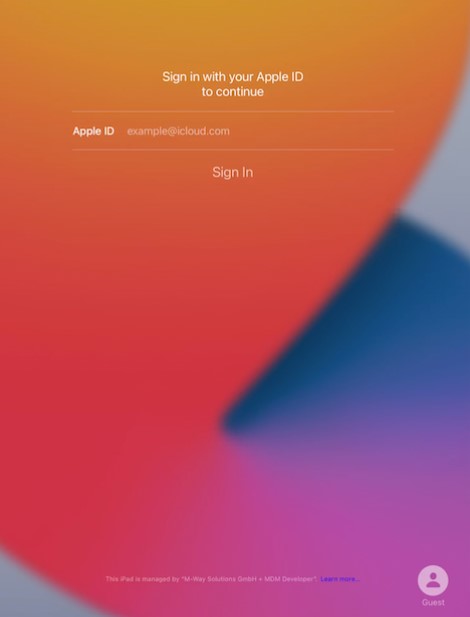
At the end of this process, it will be possible to register the iPad devices in Shared mode; once the device has been started and after selecting the language and the respective location, the user will only have to connect to a Wi-Fi network to start configuring the device. Once the configuration procedure is complete, the sign-in screen will be displayed where the user must enter their company credentials.
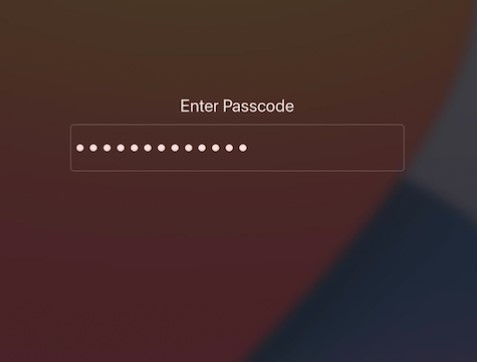
At this point, the user will be prompted to enter a passcode which will be requested at each subsequent access to the device.
References
Here are some useful references to the official documents:
- Overview of shared device mode;
- Dedicated device overview;
- Enroll your Android Enterprise dedicated, fully managed, or corporate-owned with work profile devices;
- Shared iPad overview;
Conclusions
This article has provided the information necessary to complete the registration process on Microsoft Intune of the various devices in Shared mode. Through the use of this management methodology, it is possible to equip your firstline workers with a device that is fully integrated into your infrastructure, making business processes more efficient and thus involving all staff in the digital transformation process.
