
In the last two years, we have seen a huge change in the way people work with an exponential increase in remote activity by employees.
This has led companies to adopt an important Digital Transformation process: companies where this transformation process had already been started were able to easily manage the switch to hybrid work.
In realities with a strong presence of data and services based on on-prem resources, it was necessary to adopt tools to allow accessibility and use even from mobile systems.
Microsoft Tunnel is Microsoft’s solution that allows access to on-premise resources by Android or iOS devices; the introduction of this solution in the company allows users to be equally productive wherever they are and from any type of device they connect.
This solution also provides other benefits such as:
- Possibility of being used behind a balancing system to ensure high availability of the service;
- Simple configuration through a centralized management console such as Microsoft Endpoint Manager;
- Automatic updating of systems within specific maintenance windows in order to generate the least possible disruption;
- Ability to send Microsoft Tunnel logs using syslog integration with Azure Sentinel or with other SIEM tools to record and monitor events;
Requirements
To be able to adopt Microsoft Tunnel you need to have the following prerequisites:
- An Azure subscription;
- An Intune subscription;
- Linux server with one of the following distributions:
- CentOS 7.4+ (CentOS 8+ not supported);
- Red Hat (RHEL) 7.4+;
- Red Hat (RHEL) 8.4;
- Ubuntu 18.04;
- Ubuntu 20.04;
- Configure the network part in such a way that the network requirements listed at the following links are met:
- Direct access to the following endpoints by the Linux server:
- Availability of a public certificate for encrypting the communication between the device and the tunnel gateway:
- The Subject Alternative Name (SAN) must contain the FQDN of the gateway Tunnel server;
- The TLS certificate must not have an expiration date greater than 2 years – if the date is higher, iOS will not accept the communication;
- The use of wildcards is supported (example: *.domain.com);
- Availability of a public IP/FQDN address with which the Microsoft Tunnel service will be exposed;
It is important to specify that only devices registered on Microsoft Intune (therefore managed) have the ability to take advantage of this service to access corporate resources.
Create Server Configuration
The use of a Server Configuration allows you to define the configurations that will be applied to the devices once the Tunnel Gateway is contacted; this configuration allows you to define: the IP range that will be assigned to the devices, the DNS servers to be contacted and any split tunneling rules.
Below you can find the steps to create a new Server Configuration:
- Access the Microsoft Endpoint Manager console with an administrative account;
- Go to the Tenant administration > Microsoft Tunnel Gateway section;
- Select the Server configurations tab;
- Click on the Create new button;
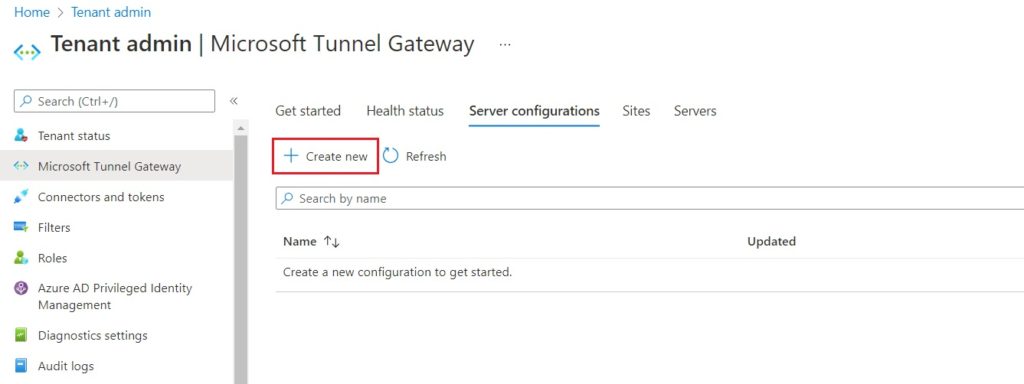
- Enter a name and any description and proceed with the Next button;
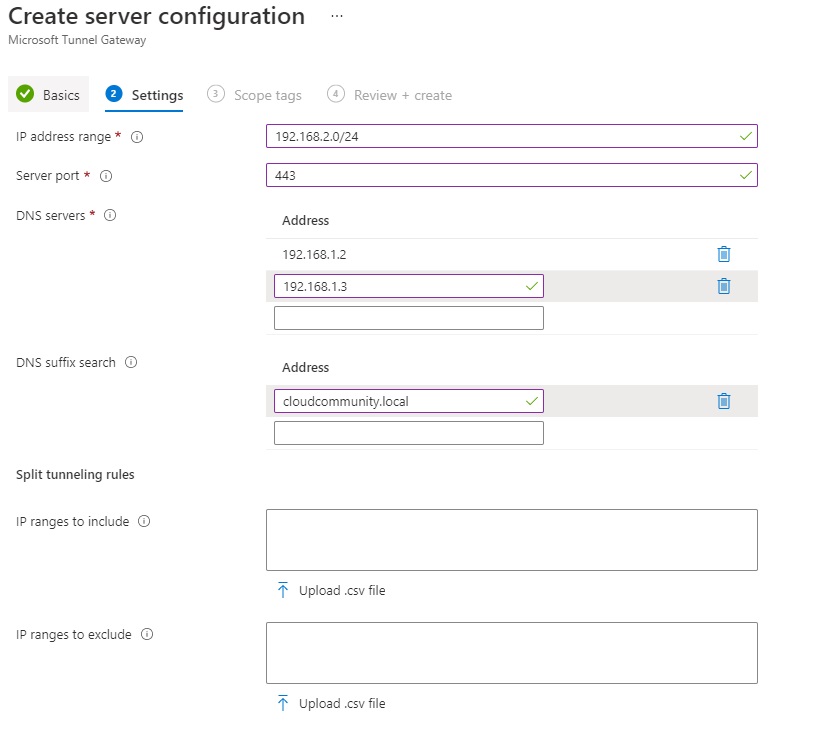
- As previously mentioned, in the Settings tab, configure the following options:
- IP address range: range of IP addresses that will be assigned to the devices when they connect to the Tunnel Gateway (ex: 192.168.1.0/24);
- Server port: indicates the port on which the server will be listening (set 443);
- DNS servers: these are the DNS servers that will be used for DNS requests from devices that are connected to the Tunnel Gateway;
- DNS suffix search (optional): this DNS suffix will be provided to clients by default;
- Split tunneling (optional): allows you to define IP addresses to be included and excluded in the routing process; the included IP addresses will be routed towards the Tunnel Gateway, while the excluded IP addresses will not be rotated towards the Tunnel Gateway.
- Press the Next button;
- Proceed with the wizard until creation through the Create button;
Create Site Configuration
Sites are nothing more than logical groupings of servers that host the Microsoft Tunnel role; these servers will then be assigned a specific Server Configuration which will be specified during the Site creation process.
Below are the steps to perform this process:
- Log in to the MEM console with an administrative account;
- Go to the Tenant administration > Microsoft Tunnel Gateway section;
- Select the Sites tab;
- Click on the Create button;
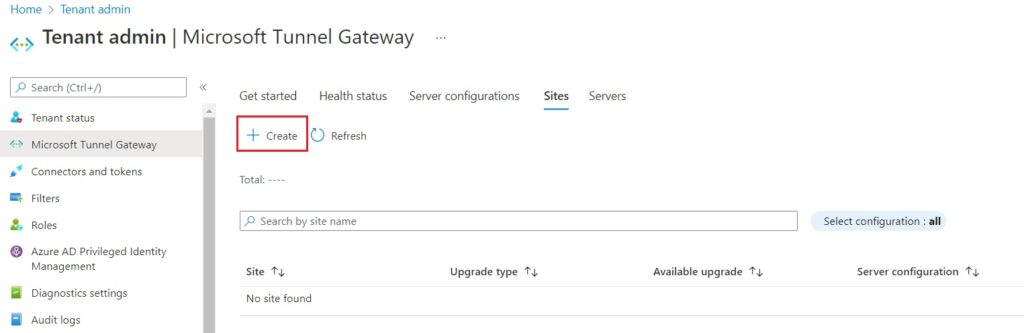
- Enter a name and any description and proceed with the Next button;
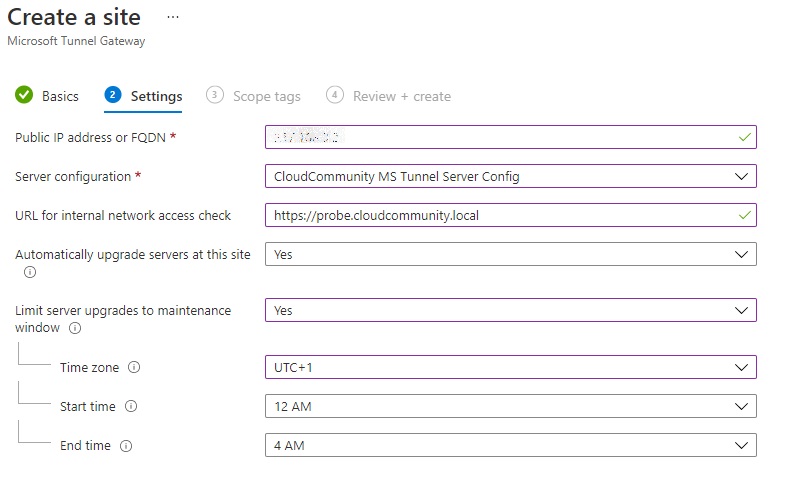
- Within the Settings tab, configure the following options:
- Public IP address or FQDN: configure the public IP address or public FQDN with which the Tunnel Gateway is published; this address / FQDN will be used by the devices to establish communication with the Gateway server.
- Server configuration: from the drop-down menu, select the previously created Server Configuration.
- URL for internal network access check: define an HTTP or HTTPS URL that will be used by the server to determine if it is able to access internal resources correctly; polling is performed every 5 minutes.
- Automatically upgrade servers at this site: if the Yes option is selected, the upgrade of the server(s) will be performed automatically; if the No option is selected, the upgrade will only be performed upon manual approval by an administrator.
- Limit server upgrades to maintenance window: if you have selected to perform the automatic update, by setting this option to Yes, you can define a maintenance window within which the update will be performed.
- Press the Next button;
- Proceed with the wizard until creation through the Create button.
Microsoft Tunnel installation
Once the creation of a new Server Configuration and a new Site has been completed, it is possible to proceed with the installation of the Microsoft Tunnel feature on the prepared Linux server; requirement of this feature is the presence of Docker version 19.03 CE or later.
Connect to the Linux server set up for this feature and run the following commands (the steps below refer to installing Docker on a Linux CentOS version 7.9):
If the Linux server is able to access the Internet without restrictions, execute the following commands:
sudo yum install -y yum-utils
sudo yum-config-manager \--add-repo\https://download.docker.com/linux/centos/docker-ce.repo
sudo yum install docker-ce docker-ce-cli containerd.io
If not, do the following:
- Access the link https://download.docker.com/linux/centos/;
- Select the CentOS version of the Linux server involved;
- Go to path x86_64/stable/Packages/;
- Download the following rpm files:
- docker-ce
- docker-ce-cli
- io
- docker-scan-plugin
- docker-ce-selinux
- docker-ce-rootless
Once the files have been downloaded, copy them into the tmp folder of the Linux server and start the installation with the following command:
sudo yum install <path>\docker-ce-<version>.rpm docker-ce-cli-<version>.rpm containerd.io-<version>.rpm
In case the prerequisites for Docker are not available on the CentOS server, you may receive the following error message:
Error: Package: docker-ce-rootless-extras-20.10.8-3.el7.x86_64 (docker-ce-stable)
Requires: slirp4netns >= 0.4
To allow the automatic installation of the requirements, follow the steps below:
- Access the folder containing the yum repositories:
cd /etc/yum.repos.d
mv CentOS-Base.repo CentOS-Base.repo_bak - Add the following entries to the beginning of the /etc/yum.repos.d/docker-ce.repo file:
[centos-extras]
name=Centos extras – $basearch
baseurl=http://mirror.centos.org/centos/7/extras/x86_64
enabled=1
gpgcheck=0 - Save the file;
- Force the installation of the slirp4netns, fuse-overlayfs and container-selinux components through the following command line:
sudo yum -y install slirp4netns fuse-overlayfs container-selinux
Once the Docker installation process has been completed, proceed with the startup and the respective configuration to allow the automatic start of the service automatically when the system is started:
sudo systemctl start docker
sudo systemctl enable docker.service
sudo systemctl enable containerd.service
Once the Docker installation process is complete, you can proceed with the installation of Microsoft Tunnel;
- Download the installation script in one of the following ways:
- Download from a browser through the following link;
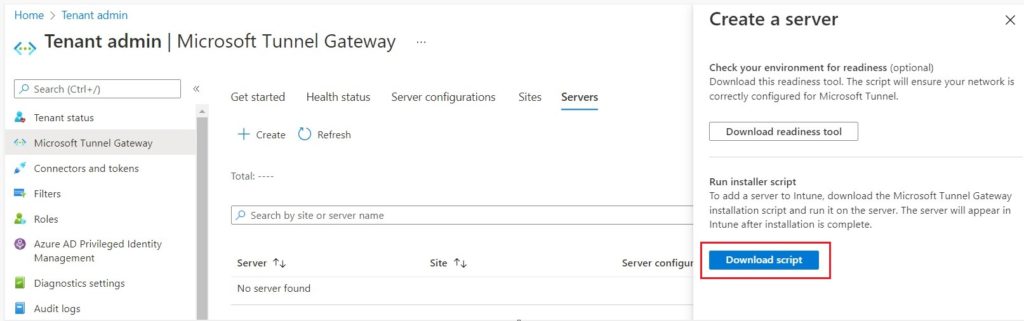
- Through the Microsoft Endpoint Manager portal in the Tenant administration > Microsoft Tunnel Gateway > Servers > Create and press the Download script button;
- Download directly from the Linux server through the following command: wget –output-document = mstunnel-setup https://aka.ms/microsofttunneldownload;
- Start the installation procedure by running the previously downloaded script:
sudo chmod +x ./mstunnel-setupOnce started, the script will automatically download the image from the Microsoft Intune endpoints and create the necessary folders / files.
- Accept the EULA;
- Check and possibly modify the variables in the /etc/mstunnel/env.sh file as required;

- Rename the certificate related files as shown below:
- PFX format -> site.pfx
- CRT format -> site.cer (for certificate and related chain) and site.key (for private key)
- Copy the files relating to the certificate in the appropriate folders as indicated by the procedure using the following commands:
- PFX format
cp [path / site.pfx] /etc/mstunnel/private/site.pfx - CRT format
cp [path / site.crt] /etc/mstunnel/certs/site.crt
cp [path / site.key] /etc/mstunnel/private/site.key
- PFX format

- During the import process, if a password-protected pfx file is used, the latter will be requested:

- At the end of the import process, in order to start the registration of the Microsoft Tunnel Gateway server on the Microsoft Intune portal, it is necessary to log in to the indicated link (https://microsoft.com/devicelogin), authenticate with a Global Admin account or Intune Administrator and finally enter the indicated code:

- Once the registration is authorized, verify that the creation process completes successfully and that the server is correctly registered in the Server section of the console.
References
Here are some useful references to the official Microsoft documentation:
- Monitor Microsoft Tunnel;
- Upgrade Microsoft Tunnel for Microsoft Intune;
- Use Conditional Access with Microsoft Tunnel in Intune;
Conclusions
This article has provided an overview of the Microsoft Tunnel solution that allows you to access corporate resources through mobile devices.
In the next article, we will see how to distribute the app needed to connect with the Microsoft Tunnel server and how to configure the devices to establish the VPN connection using this solution.
