
Digital transformation plays a crucial role in the development of companies’ production processes and requires all employees to have the necessary digital tools. For this reason, it is advisable to provide the figures in the company defined as first-line workers (or front-line workers) with the necessary tools to be able to perform their business in the best possible way. Through the use of dedicated devices, it is possible to maintain the security of corporate information and centrally manage your assets.
In this article I will focus on management of Android devices in the mode called Dedicated Device using the Microsoft Managed Home Screen application to provide a managed multi-user experience. In addition, I will use the functionality in Public Preview called Azure AD Shared devices mode.
Usage scenarios
First-line workers are the backbone of companies and are the point of contact between the customer and their organization; these people are also involved in the daily operations of the company without necessarily being equipped with a device or a PC.
Through the adoption of Android devices in the Dedicated Device mode, it is possible to actively involve first-line workers and increase their efficiency.
Before proceeding with the details related to the solution, I report below some use cases where this management methodology is optimal:
- Healthcare sector: it is possible to equip medical staff (doctors and nurses) with devices to consult information on patients in a functional way, managing at the same time the multiple shifts;
- Retail sector: leveraging the potential of artificial intelligence and machine learning, their frontline employees will be able to provide customers with a personalized experience based on their preferences;
- Logistic sector: through the use of dedicated devices, the warehouse staff is able to view the movement of goods in real time and be always updated on any stocks.
Requirements
In order to proceed with the registration of your Android devices in the manner mentioned above, you must have the following prerequisites:
- Android 6.0 or later versions ;
- The devices will need to run an Android distribution that includes Google Mobile Services (GMS) and the ability to connect to them;
- Set the MDM authority to Microsoft Intune (some details here);
Connect Microsoft Intune to Managed Google Play
To manage your devices through the Android Enterprise method, first of all, you need to put your Microsoft Intune tenant in communication with a Managed Google Play account.
To authorize this type of communication, you need to follow these simple steps:
- Open Microsoft Endpoint Manager console with administrative rights;
- Select Devices – Android – Android Enrollment – Managed Google Play;

- Accept the terms and conditions to authorize Microsoft to send user and device information to Google;
- Press the Launch Google to connect now button to start the connection process between the two environments;
- At this point, you will be redirected to a login page where you will need to enter your Google account (if you already have it) or you can proceed with the creation of a new one. It is necessary that the account is not associated with any G-Suite domain.
- During the association wizard, enter the name of your organization and make sure that the Enterprise mobility management (EMM) provider is set to Microsoft Intune;
- Accept the terms and conditions for the Android part and confirm with the appropriate button.
Once this process is complete, you will be able to create a new Enrollment Profile to define how devices are registered on the Microsoft Intune portal.
Enrollment Profile creation
To allow you to distribute your devices in Dedicated mode, you need to create a registration profile; this profile will provide a registration token (string) or a QR code that must be used by users to allow the registration of devices in this mode.
If you have the Knox Mobile Enrollment (KME) service, you can provision Android devices in Dedicated mode without the need to provide users with the token or QR code. More information on the KME service is available at the following link.
Below are the steps necessary to create a new Enrollment Profile:
- Open Microsoft Endpoint Manager console with administrative rights;
- Select Devices – Android – Android Enrollment – Corporate-owned dedicated devices;
- Press the Create Profile button;
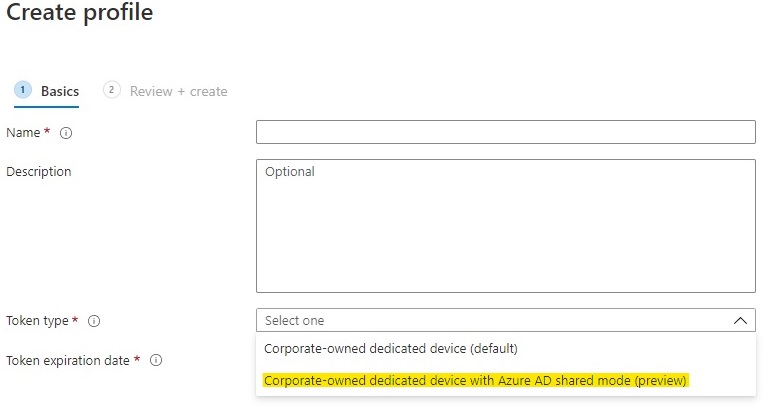
- Enter the name of the enrollment profile and a specific description;
- From the Token type drop-down menu select the Corporate-owned dedicated device with Azure AD shared mode option;
- Set the registration token expiration (it is not possible to set an expiration beyond 90 days from the creation date);
- Continue with the creation wizard through the Next button and confirm the creation through the Create button.
Configuration Profile creation
By creating a dynamic group on the Azure AD side, it will be possible to dynamically manage the devices registered through the above profile and distribute the configurations/applications on this subset of devices. It is possible to create Azure AD groups directly from the Microsoft Endpoint Manager portal in the following way:
- Access Groups – All groups section;
- Press the New group button;
- Keep the group type a Security unchanged;
- Enter the name of the group and a specific description;
- From the Membership type drop-down menu, select the Dynamic Device option;
- Click on Add dynamic query;
- Within the Dynamic membership rules section, set the following parameters:
- Property: enrollmentProfileName
- Operator: Equals
- Value: <enrollment_profile_name> (enrollment profile created previously)
- Press Save button;
- Confirm the creation of the group through the Create button;
Before proceeding with the device configuration policy, it is necessary to deploy the Managed Home Screen application that will be used as the main interface on our Android devices.
To do this, a few simple steps are required from the Microsoft Endpoint Manager console:
- Access Apps – All apps section;
- In the search field, type Managed Home Screen and select the application that will be displayed;
- If the application is not displayed, add it using the Add button, taking care to select the Managed Google Play app option from the App type drop-down menu;;
- From the ribbon on the left, select the Properties item in the Manage section;
- Press on the Edit item in the Assignments section;
- By pressing the Add group item in the Required section and selecting the group created above, we will distribute the application to the devices managed in the previous mode;
- To confirm the distribution, press the Review + save button;
On the devices it will also be possible to add public or private applications or web applications through the Managed Google Play Store created in the process; these apps will then be installed automatically once the device has been registered. For more details on how to add apps through the Managed Google Play Store, see the References section.
At this point, we can proceed with the actual creation of the configuration policy that will prepare the devices in the Dedicated management mode:
- Access Microsoft Endpoint Manager console with administrative rights;
- Select Devices – Configuration Profiles – Create profile;
- From the Platform menu select the Android Enterprise item;;
- From the Profile drop-down menu, in the Fully Managed, Dedicated, and Corporate-Owned Work Profile section, select Device restrictions;
- Continue with the creation of the profile through Create button;
- Enter the name and a specific description of the configuration profile;
- Press Next button;
- In the Device experience section, from the Enrollment profile type drop-down menu, select Dedicated device;
- Then select Multi-app item from the Kiosk mode menu;

- Using the Add button, select all applications that must be seen by users on the devices;
- Once the applications have been defined, it will also be possible to configure some device-side settings based on your needs, such as:
- Screen orientation;
- Exit the kiosk mode by using a PIN;
- Setting a default wallpaper;
- Setting the Wi-Fi connections you can connect to;
- Press Next button;
- Press on Select groups to include and select the group created previously;
- Press Next button again;
- Check the configured settings in the summary screen and press Create button to confirm the creation of the new policy.
Managed Home Screen configuration
Through the use of an App Configuration Policy, it is possible to customize the interface that will be displayed by the user on the device. The customization of the Managed Home Screen can be performed in two ways:
- Configuration designer: in this mode, it is possible to define some settings directly from the graphical interface but, at present, the set of settings is reduced.
- File JSON: through the use of a file in JSON format, it is possible to configure all the settings available for the application, including the positioning of the apps on the screen.
For the Azure AD Shared Device mode, you need to set the following settings:
| Configuration key | Type | Value | Description |
|---|---|---|---|
| Enable sign in | Boolean | true | Activate Sign-in button |
| Sign in type | String | AAD | Authentication type |
| Enable Auto Sign-out | Boolean | true | Activate auto user logoff after inactivity time |
| Auto Sign-out time | Integer | 300 (default) | Time in seconds before user logoff |
| Count down time on auto Sign-out dialog | Integer | 60 (default) | Time in seconds before logoff count down is displayed |
Below are the steps necessary to customize the Managed Home Screen application:
- Open Microsoft Endpoint Manager console with administrative rights;
- Select Apps – App Configuration Policies;
- Press Add button and select Managed devices;
- Enter the name and a specific description;
- From the Platform drop-down menu select Android Enterprise option and, later, from the Profile Type menu select Fully Managed, Dedicated, and Corporate-Owned Work Profile;
- Press Select app and, through the search field, select Managed Home Screen app;
- Confirm your choice with OK button;
- Press Next button;
- From the Configuration setting format drop-down menu, select the methodology you want to use to customize the application;
- If Configuration Designer mode is used, pressing Add button will display all the settings currently available;
- Add the settings shown in the table above and add any other settings as needed;
At the following link, a sample is available to use to configure the Managed Home Screen through the use of a JSON file (as applications I used Microsoft Edge and Microsoft Teams).
NOTE: Through the use of grid_size property, it is possible to define the subdivision of the screen of our device in such a way as to be able to pre-configure the positioning of distributed applications.
For example, if I set the value “3; 7” to the grid_size property, my device will be divided as follows:

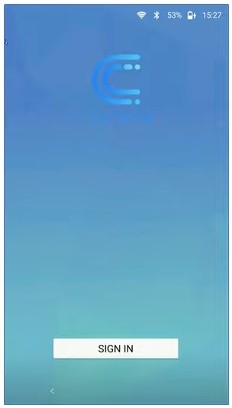
At this point, it is possible to proceed with the registration of the device through one of the methods indicated in the References paragraph below; at the end of the registration process, the user will be able to log in to the device with his/her Azure AD credentials through the Sign In button.
References
Here are some useful references to the official Microsoft documentation:
- Dedicated device Overview
- Add Managed Google Play apps to Android Enterprise devices with Intune
- Enroll your Android Enterprise dedicated, fully managed, or corporate-owned with work profile devices
Conclusions
This article has provided the information you need to complete the enrollment process on Microsoft Intune for Android Enterprise Dedicated mode with Azure AD shared devices. Through the use of this management methodology, it is possible to equip your employees with a device that is fully integrated into your infrastructure and which allows you to make the production process more streamlined and efficient.

One thought on “Android Enterprise Dedicated mode with Azure AD shared devices”