
Microsoft Intune enables enterprises to effectively manage mobile devices, ensuring data security and compliance with corporate policies while enabling employees to work more productively and securely.
The life-cycle of mobile devices is a process that includes several phases, from provisioning to decommissioning due to obsolescence or for possible reassignment; precisely with regard to the first step, Microsoft Intune offers, with a few simple steps, the possibility of registering the different types of devices present in the company.
On Android platform, the following methods of registering corporate devices (therefore owned by the company) are available and depend on the operating system present:
- NFC (starting from Android 8.0)
- Token (starting from Android 8.0)
- QR code (starting from Android 8.0)
- Google Zero Touch (starting from Android 8.0)
- Knox Mobile Enrollment (starting from Android 8.0 – only for Samsung Knox version 2.8 or above)
In this article, we will explore how to register Android devices using an NFC tag.
Overview
Near Field Communication (NFC) is a short-range wireless communication technology that allows data to be transmitted between devices over very short distances; NFC tags are passive devices on which information such as URLs, text and phone numbers can be stored.
The advantages of using these tags for the registration of Android devices are many:
- Simplicity: device registration via NFC is simple and intuitive; just bring the Android device close to the NFC tag to start the registration procedure;
- Automation: registration can be automated, thus eliminating the need for human intervention;
- Security: the use of NFC tags helps ensure data security;
- Cost reduction: via NFC it is possible to speed up the registration process thus reducing times and, consequently, the costs that weigh on IT;
In conclusion, using NFC tags to enroll Android devices in Microsoft Intune is a simple, automated, and secure solution that can help reduce costs related to mobile device management.
In the next paragraphs, we will go into detail on the steps necessary to use this recording mode.
Connecting Intune to Managed Google Play
The first step in managing devices using Android Enterprise methodologies is to put your Microsoft Intune tenant in communication with a Managed Google Play account.
To authorize this type of communication, you need to follow these simple steps:
- Log in to the Microsoft Endpoint Manager admin center console with administrative credentials;
- Select Devices – Android – Android Enrollment – Managed Google Play;
- Accept the terms and conditions to authorize Microsoft to send user and device information to Google;
- Press the Launch Google to connect now button to start the connection process between the two environments;
- At this point, you will be redirected to a login page where you will need to enter your Google account (if you already have one) or you can proceed with the creation of a new one. The account must not be associated with any G-Suite domain.
- During the association wizard, enter the name of your organization and make sure that the Enterprise mobility management (EMM) provider is set to Microsoft Intune;
- Accept the terms and conditions for the Android part and confirm using the appropriate button.
Once this process is complete, it will be possible to create a new enrollment profile to define the enrollment mode on the Microsoft Intune portal.
Enrollment Profile creation
To allow the registration of the devices in the relevant mode, it is necessary to create a registration profile; this profile will provide an enrollment token (string) which will be used in configuring the NFC tag.
Below are the steps necessary to create a new Enrollment Profile in Fully Managed mode:
- Log in to the Microsoft Endpoint Manager admin center console with administrative credentials;
- Select Devices – Android – Android Enrollment – Corporate-owned, fully managed user devices;
- Move the slider of the “Allow users to enroll corporate-owned user devices” setting to Yes and copy the generated token;
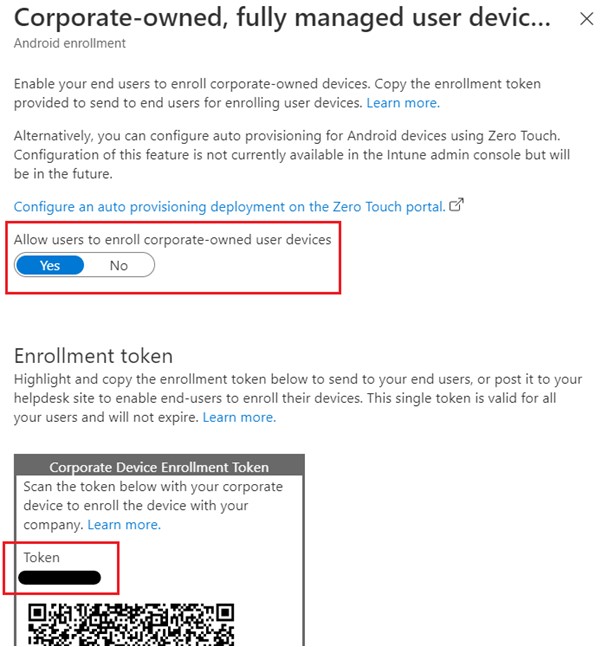
The copied token will be used to configure the NFC tag so that it can be used for registering new devices.
NFC tag configuration
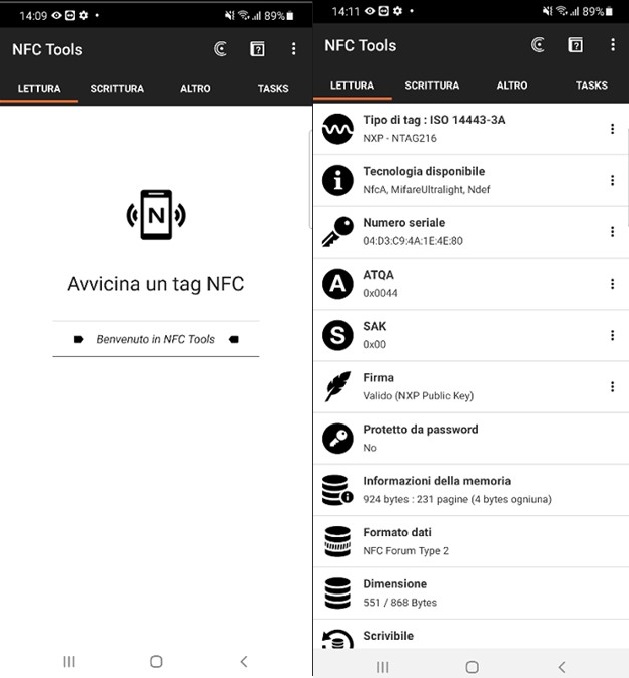
As previously reported, NFC tags are passive devices on which information can be stored. This procedure can be performed through special apps available on the main public stores; in this case, the NFC Tools app was used.
Below are the steps required to configure the NFC tag:
- Start the NFC Tools app from your device and bring the NFC tag close so that it can be read by the application;
- If the NFC tag has already been used for other activities, it must be cleaned using the Format memory option in the Other section.
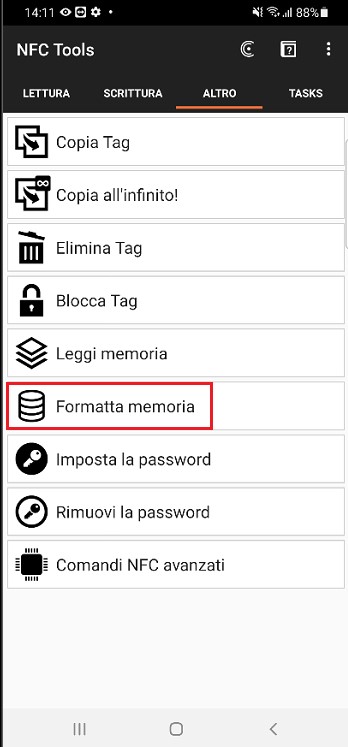
- Bring the NFC tag close to the device until the successful formatting notification appears.

- At this point, by accessing the Writing section, it is possible to proceed with the registration of the information necessary for enrolling the devices on Intune.
- Press on the Add field option and select the Data item.
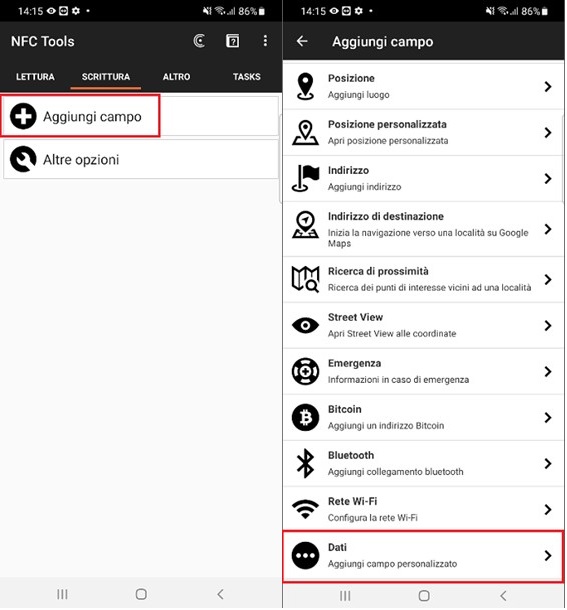
- Within the Content Type field, enter the string application in the first text box and android.managedprovisioning in the second text box.
- In the Data field, enter the string shown below taking care to replace the previously copied token in place of the highlighted text.
android.app.extra.PROVISIONING_DEVICE_ADMIN_PACKAGE_DOWNLOAD_LOCATION=https://play.google.com/managed/downloadManagingApp?identifier=setup android.app.extra.PROVISIONING_DEVICE_ADMIN_SIGNATURE_CHECKSUM=I5YvS0O5hXY46mb01BlRjq4oJJGs2kuUcHvVkAPEXlg android.app.extra.PROVISIONING_DEVICE_ADMIN_COMPONENT_NAME=com.google.android.apps.work.clouddpc/.receivers.CloudDeviceAdminReceiver android.app.extra.PROVISIONING_ADMIN_EXTRAS_BUNDLE=com.google.android.apps.work.clouddpc.EXTRA_ENROLLMENT_TOKEN=<TOKEN>
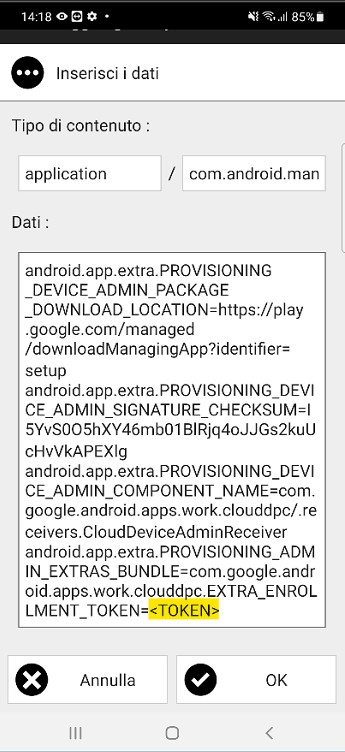
- Confirm the changes using the OK button.
- Press the Write button and bring the NFC tag close to the device until the correct writing notification is displayed.
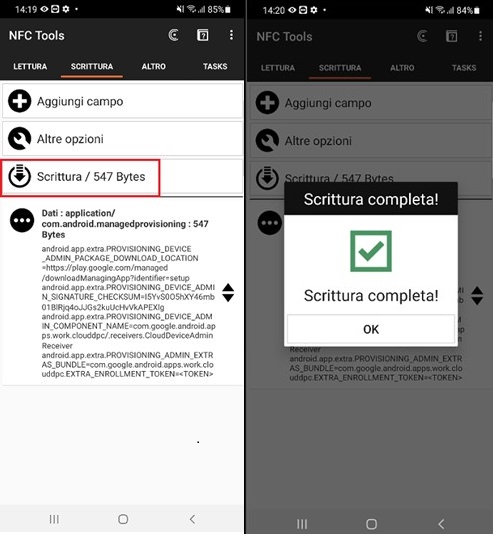
Now that the NFC tag has been properly formatted and programmed, you can use that solution to enroll Android devices in Intune.
As previously reported, the use of this mode is particularly simple and fast; in fact, once a reset to the factory settings has been carried out (in the event that the device has already been previously configured) or by starting the new device, it is only necessary to bring the NFC tag close to the device in front of the initial welcome screen.
References
Here are some useful references to the official documentation:
- Deployment guide: Enroll Android devices in Microsoft Intune
- Enroll your Android Enterprise dedicated, fully managed, or corporate-owned with work profile devices
- Enroll your corporate device with the Microsoft Intune app
Conclusions
In this article, we have been reported the various steps necessary to register your Android devices on Intune using a modern and fast method like scanning a QR code.
The adoption of this methodology allows IT Admins to automate the device registration process while ensuring data security.
